Showing posts with label Sewing. Show all posts

Wednesday, March 8, 2017

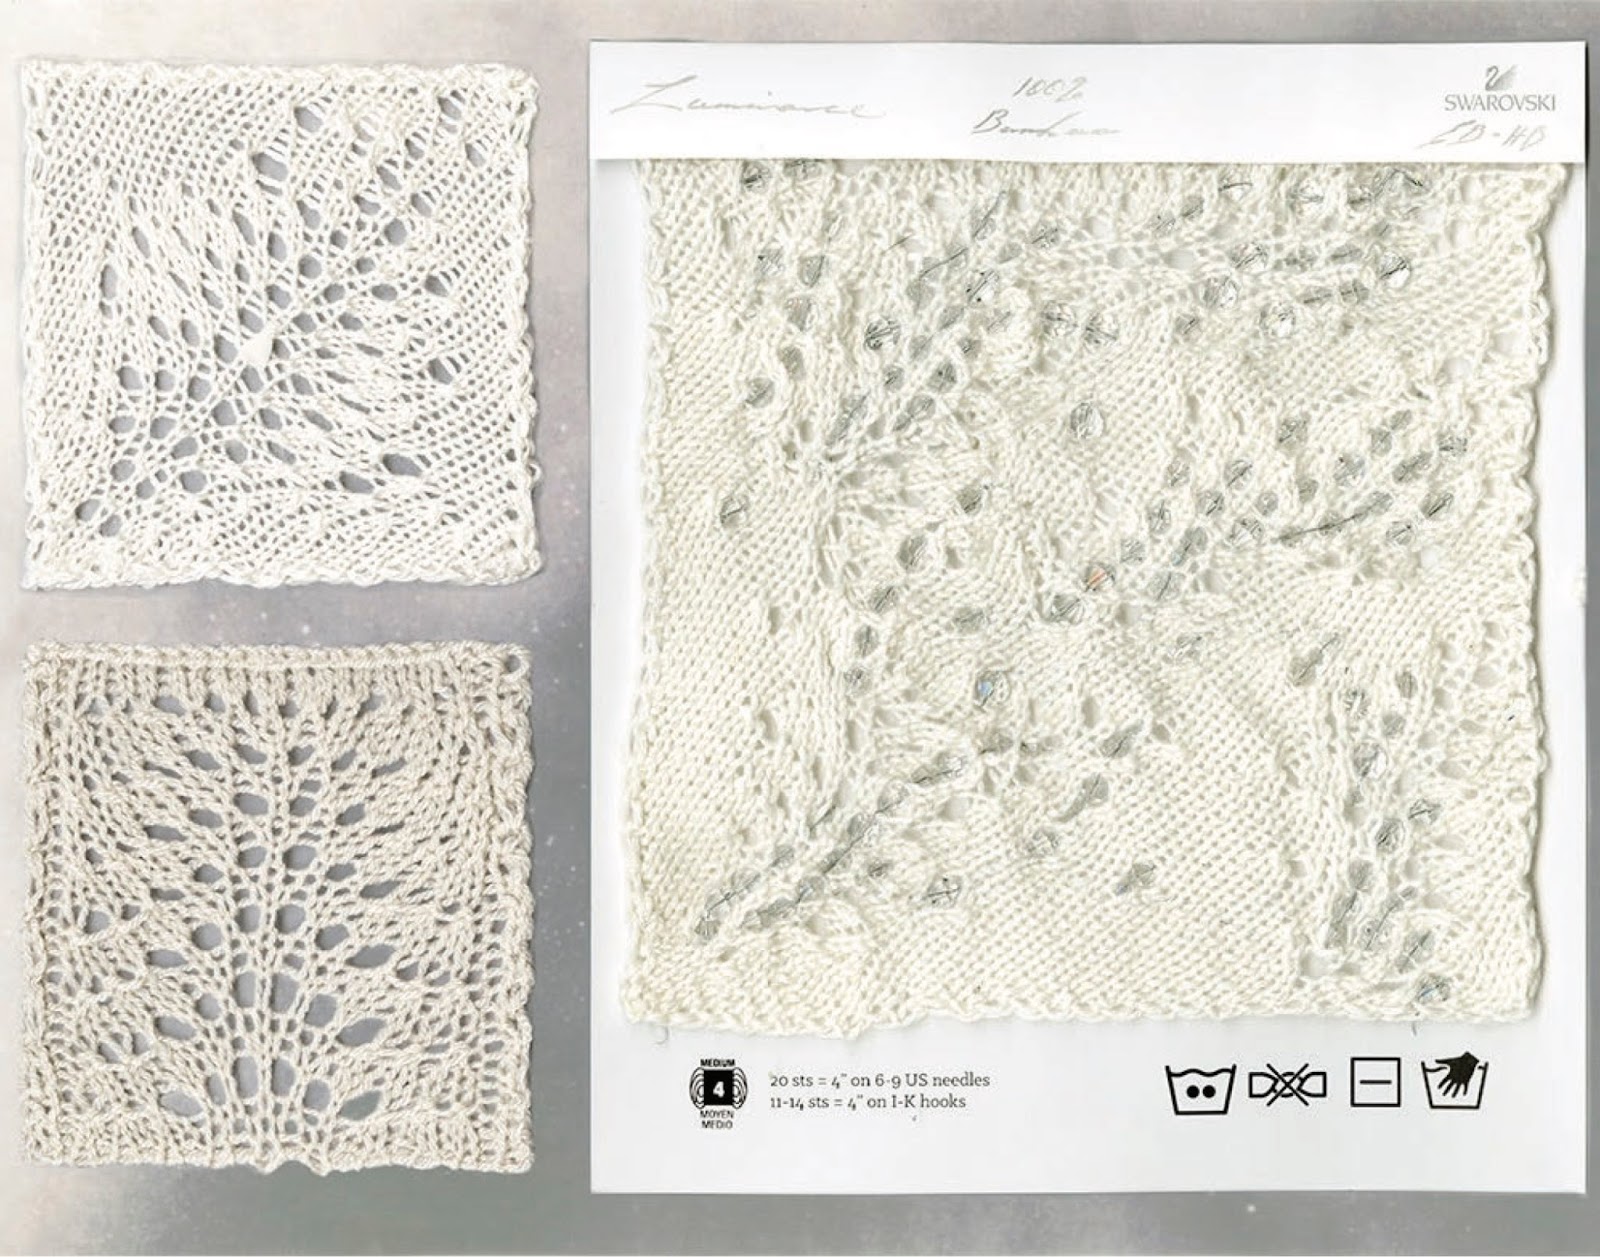
Sparkly Things


Over the summer, I looked at a lot of broken glass.  It was comforting and beautiful to see light reflect and bounce off of something considered incomplete.  The summer, was also a huge healing process for myself.  I felt a little broken at the time, but by the end of the summer I was a little more pieced together and shards of glass really didn’t seem like it fit this upcoming chapter.  

I didn’t end up going with broken glass.  

I went with something a little more whole.

I didn’t want to look back at this time of my life and see my art and remember it as broken. I didn’t want anything I created to give off this feeling. I wanted something more whole, something more healing. So, instead of using broken pieces of glass, I starting dreaming up the idea of using real crystal.

It all started with meeting an amazing artist here at SCAD. Hannah (this girl is filled to capacity with creative energy). I’ll be talking about her in later posts fo sho. This girl's heart is beading.  I mean, she live it, dreams it, breathes it.  She'll stay up for hours till 3am beading away, not because of a deadline that's making her stay up to these sunless hours, but because she just gets so wrapped up in the processes and love of a finished piece.  We soon became friends and talked about working together.  I wanted to use what she was most naturally gifted with.

With that, I decided to no longer use glass. and reached out to the lovely people at Swarovski Crystal. I’m incredibly thankful to be working with them, who were so kind to sponsor Hannah and I in this collection. These crystals the most sparkly, radiant things I've ever seen and I couldn't be more excited to work with such materials!

And now for your eyes some sparkly things!


For more vids and swatches for dayzzzz, check out my gram! 
instagram: estherboller 

Wednesday, July 15, 2015

Summer Sewing: Vintage 1950s Beach Shorts

All photographs are self portraits taken by myself using a tripod.
Styling:  Esther Boller

Last summer was a very productive time of sewing, photography, and playing around creating.  In fact it was was a little too productive. I'm just now finding the time to edit some of the photos/projects from last summer (40 gigabytes of photos and I vow never again to let it get that bad stocked up again.  Maybe).

I started making these shorts that I'm wearing years ago.  Probably sometime in high school, but I just finished sewing them last summer.  That's the thing with textile creatives - we always have 10 projects going on at once!

I'm currently working a part-time job at a yarn/fabric shop in NYC called Purl Soho and it's heaven for the textile lover!  If you're in NYC stop by and say hi.  They also have a great project blog called The Purl Bee.  Anyway, the most common conversation that I have with other makers is about how we always have a bazillion projects going on at once.   It's just so easy to get excited about a new project and leave the old one behind for a while.  That is, until I realize that I have 10 left-behind projects that need finished.  I find this especially easy to do with knitting.

Well these shorts were one of the 15 projects that took a little longer to finish.  But I finished them just in time for when I went on vacation in Michigan last June.  They were perfect for the beach, and so comfortable.  I made them from a vintage Annie Adams pattern and I've been making new variation of these same shorts for years.  The fit is just so comfy.

I always get in a 1950s inspiration kick whenever I know I'm going to the beach.  So naturally the styling and editing of the photos were done to reflect that era.  

Head Scarf, sunglasses, tank top, and belt:  Thrifted,  Necklace:  Red Clover Boutique,  Shorts:  Handmade by me

Also, Leon Bridges has been the soundtrack to my life so far this summer.  Check out his tunes if you haven't already!


Xx
Esther 

Saturday, June 27, 2015

Good Morning Moon


All photographs are self portraits taken by myself using a tripod.
Styling and set design:  Esther Boller

The Great Gatsby will always be one of my favorite books.  Fitzgerald's books are so clearly written and there's such a high level of beauty in his words.  I've always been inspired by characters in books/movies, and as I've written before, Gatsby is an inspiration I always go back to.  There's something so whimsical and soft about the of the clothing in that era.  It feels more theatrical and special and I swoon over it all.   I've slowly been collecting pieces here and there that nod back to that era, though I can't afford the real deal.

While this dress isn't a true 1920s piece, it's a vintage Guess dress that I scored at Goodwill on 50% off day.  That was a triumphant thrift day.  I made my headband to complete my look which was very simple.  I just cut out a piece of applique from a beaded dress that I also bought at goodwill.  I always buy beaded items when I can to cut up for the beads. It's a lot cheaper and better quality of beads than buying from craft stores (always wait for the 50% off days though).  Once my shape was cut, I then ironed a piece of heavy fusible interfacing onto the back.  This makes the applique super firm.  Then I stitched a piece of ribbon onto the back and magic - we're in the 20s.  


Headband:  DIY,  Dress:  Vintage Guess,  Shoes:  JC Penny,  Necklace:  H&M sale.  
Stay magical.  

Xx
Esther 

Sunday, March 8, 2015

A Mid Starry Night

All photographs are self portraits taken by myself using a tripod and self timer.
Clothing design + styling:  Esther Boller

From my past few previous posts, you've probably noticed that I have a thing for the Shakespeare play, A MidSummer Nights Dream.  It's pure magic!  I watched it for the first time this past summer and became completely enchanted by the story.   Although, I mostly fell in love with the whimsical and gorgeous costumes and set design.  I went on a Midsummer Night's kick and watched every movie variation that I could find.  I saw the 1935s film which is by far one of my favorite versions.  I've included a few screen shots below that are just too beautiful not to share.  


That film was the inspiration for this photo shoot.  This entire shoot was about recreating a bit of the magic that I felt while watching this movie.  I made everything that I'm wearing.  The beaded blouse is made from an old beaded skirt that I bought at Goodwill on 50% off day.  I cut a wrap design from it then hand sewed the pieces together and finished off the edges by hand sewing silk bias tape. 


The headband is also made from the same Goodwill skirt that was used to make the bodice.  I cut around the floral beaded design and then ironed on a heavy interfacing to make it stable and stiff.  I later glued the pieces together to a piece of ribbon.  In an upcoming post I'll be sharing a tutorial showing how to make the headband that I wore in this shoot.  This one is pretty over the top, but I'll show a more wearable variation.  


Making this skirt was a lot of fun!  I made it over the summer as a fun side project that I could pick up and hand sew whenever I had down time from working.  Each petal was hand cut to the shape of a flower petal.  Once shaped, I took a lighter around the edges to melt the sides so that it wouldn't fray.  This was before I found out about laser cutting (which I talked about in my previous post).  Then, one by one, I hand stitched each petal to the skirt making a petal gradient.  

It's currently the last week of finals, and I'm very excited to share what I'm making!   The final is one look that includes a jacket, trousers, and a knit top.  Below is a preview photo of my jacket that I posted on instagram.
I also still have a lot of projects from the summer to share with you (I have over 64 GB worth of unedited photos from the summer still - Oops.)  I'm hoping to catch up and share more of the summer projects over spring break next week.

Thanks for keeping up with my work!  

Tuesday, February 17, 2015

A Midsummer Night's Dream: The Dress

Dress:  Esther Boller
Photography + Styling:  Esther Boller
Model:  Brittani

The design inspiration for this dress comes from Shakespeare’s A Midsummer Night’s Dream; a story that’s inspired many artists in the past - from directors to illustrators and writers. Mostly inspired by the 1935 black and white film’s adaptation of the play, I began to think about the era of the 1930s as well.  I took design elements of that era, including art deco seam detailing, and combined them with the soft, romantic, textural elements that were influenced by nature. 

The garment was constructed using the process of draping; using 30 different pattern pieces.   Each piece was individually draped on a mannequin and then transferred onto paper and later corrected.  Below are photos of the initial design lines and later at the half-pinned muslin stage.  This is when only have of the pattern is cut out and pinned to the mannequin to double check shape and alignment before cutting out a full pattern.
The seams were finished using the french seam technique so that the seams wouldn't unravel later.  The raw edges were finished by hand sewing strips of chiffon that were cut on bias and later folded and pressed.

The embellished elements were designed and made by laser cutting silk chiffon.  Which guys - lazer cutting is the BOMB!    At first when I was developing my initial concept I was hand cutting and burning each edge with a lighter so it wouldn't fray.  When I showed it to my professor she laughed, calling it a "handmade, filthy piece of trash" and told me that I should lazer cut them instead.   The light bulb went off, and I will never go back to hand cutting again

The little frayed puffs are hand cut circles of  polyester organza which I then rubbed in my hands to create a frayed effect.  They were later hand stitched onto the style lines of the seams. 


Through this project I learned so many new techniques, and I can't speak more highly of my professor, Sachi.  Sachi is the most dedicated professor I have ever met.  I respect her so much for her skill and knowledge and was so grateful for the amount of time that she poured into our class.  I'm hoping to take as many classes with her as possible!   Below is a photo of my class on the final day of critique. 
I've just started my final project for this quarter this week.  I can't wait to share that project with you next!  Till then, happy sewing!

P.S.  This dress is also for sale in my Etsy Shop!


Tuesday, February 10, 2015

A Midsummer Night's Dream: The Process

Last quarter I took Apparel 1 (draping), and I designed my final project around the inspiration of A Midsummer Night's Dream and the era of the 1920s.  I thought that I'd share with you a bit of the design process that went into making it.  I'll share more of the draping and sewing process in the next post when I show the final garment.   
Below is the initial croquis.  I drew over 40 different design variations and picked the one that I liked best.  Below is the one I chose.
Along with the final look, the class was told to pick four other looks to go with the one design to create a five-piece mini capsule collection.  Below is the five look lineup that I chose.
Flats were drawn after the muslin stage.
During the time of making the garment we had to keep a process book.  Here are a couple different texture pages from it. 


Below is a page of a process book that I keep my photography ideas in. The whole time I was envisioning a shoot with white paper butterflies so I sketched it out.
Sneak peek of the final shoot:
I'll be posting the final dress later this week!  I’m very excited to finally share it with you!  

Monday, October 13, 2014

Announcement: If you're in Savannah...

Hello everyone!  I've been a little quiet lately, because I've been preparing for an exciting event that's coming up this weekend!  If anyone is in the Savannah area this Friday, October 17th, come to the Urban Outfitters on Broughton Street.  I will be selling my clothes in their store that day as they take place in their first Marketplace vendors sale!   The store has invited several local artists and craftsmen to showcase and sell their work for a vendor day, and I’m very excited to have been asked to be a part of it!  I've been sewing new clothes non-stop (when I'm not sewing for school work) the past few weeks and I'm excited to finally share it all. 

I'll have a table and will be showcasing/selling my work this Friday from 12pm-7pm.  If you’re in the Savannah area, please come in and say hi!!  This is my first vendor sale and I’m a little nervous so it would be such a joy to meet a few friendly faces!
Here's an Instagram preview of one of the dresses that I'll have for the sale. 

Hopefully I’ll see you there!  And, for those of you who aren't in the Savannah area, I will be making new items for my Etsy shop soon after the sale!  

Sunday, October 5, 2014

Tutorial: Vintage Inspired Fur Wrap

Here it finally is - the fur wrap tutorial!  Fur lapels are really fun, whimsical pieces to add to a jacket or coat and is perfect for this fall season.  This tutorial is a fairly simple and quick project to make.  Below are the steps showing how to make your own!
Materials:
3/4 yard of fur (faux or real, whichever is your preference)
Lining (roughly around the same color as fur)

Step 1.  Cut out your pattern piece.  This will take some experimenting and problem solving depending on the length and width that you want your wrap to be.  I based mine off of the shape of blazer lapel.  Make a few tests from scrap fabric or muslin until you get the shape that you want.

 Your pattern should look roughly like the shape of the below photo.  Remember to add 1/2 inch for your seam allowance on all sides.

Step 2.  Once your paper pattern is cut, place it on the wrong side of your fabric and only cut one piece at a time.  Take a marker and trace around your pattern directly onto the fabric.  It's ok to use a marker for this, because it's not going to be seen.

Side note:  Ignore the lines on the below pattern paper.  I was using old paper that had already been marked on.
Step 3.  Carefully cut the pattern out using the very tips of your scissors.  When cutting fur you want to use the tips so that it doesn't cut the fur short.    This part can go relatively slow, but you want to make sure that you're cutting as little amount of fur as possible.  We're not giving it a hair cut at this point!  Another method is to take a sharp razor/exacto knife and cut into the pattern. This way of cutting is quicker, but make sure that you're still carefully following your marker line.

Once the first piece is cut out flip your pattern over and cut a second piece.  Cut the two lining pieces as well.
Step 4.  Once the fabric is cut out, pin the center back neck seams together.  You want to make sure that the fur is going inward when pinning.  This is because we want as much of the fur as possible to be showing on the outside so that the seam is as invisible as possible.

The easiest way to do this is to lay your pattern seams flat side by side, and then one inch at a time pinch both sides together and pin so that the fur is going inside the pinch.

Step 5.  Using a small stitch length sew the two pieces together.  Sew the two lining pieces together at this point as well.
Step 6.  After sewing, your seam should look like the below photo - all of the fur is going towards the right side of the seam.
Step 7.  Now pin the lining to the fur and sew around the whole wrap leaving a 5-6 inch opening at the top.  This is so we can turn it inside out later.  Remember to keep the fur at the seam going towards the inside all the way around.
Step 8.  After sewing cut several snips into the seams that curve.  This will allow it to lay flat.

Step 9.  Through the opening turn the wrap inside out.

Step 10.  Pin and hand sew the top opening shut using a whipstitch (link to a youtube tutorial on whip stitches).
Tada!  You now have a new fall accessory to add to any jacket!
If you make one, post a photo and share the link!  I've loved seeing all of the lovely variations of the kaftan tutorial that y'all created.  Also, if you have any questions about any of the steps feel free to add a comment, and I'll try to get to it as soon as I can!

Enjoy!